- A wooden changing screen (Like this or something i could re-fashion into that-ish... I'd love some damask in there...) to hide ugly parts of my house (my parents had one sitting in their attic for years, and I asked about it the other day, and apprently they donated it to the community theatre just a few months ago. sigh.)
- A 4x6 card box to hold recipe cards... (something simple like this, or AMAZING like this)
- "old farmhouse" style windows to put in my kitchen-- holding pictures or recipe cards, or other things that inspire me.
- A nice camera and some photography skills... my little sony is great to keep in my purse and snap random moments... but I'd kinda like a really nice camera (you know, like a step or two closer to professional) and the skills to justify having it.
- Organized craft room (I have a corner of the basement abyss. sigh)
- Turquoise paint... because I am really really inspired by turquoise and red right now, and want to paint a bookshelf...
- Miter box saw. A Valerie-sized one so I could actually complete a few projects without begging daddy to cut stuff for me. I suppose this is also a wish that would include 'skills to use said equipment'
- ...more time to accomplish all the things that float about my head!

Friday, August 27, 2010
Wish List
It's my birthday today... so I thought I would go ahead and post a wish list of things I have been dreaming of. My heart desires:
SEW THIS: Thread bag and Pin Cushion

I have recently started sewing quite a bit. I am kind of a below average sewer... but working to improve my skill. My mother taught me how to sew and until just recently when my husband set up my machine in our basement, I had sewed only on my mothers machine. So when I was sewing in my house... I was a wreck. There were threads and scraps everywhere. I couldn't seem to contain them. They exploded, then quickly organized and were staging a coup to overtake me. I couldn't think of why i was having this problem suddenly that i was sewing in my own house... and then it hit me! My mom has this nifty little thread bag thingy that sit on the edge of her sewing table that all the little threads and scraps magically fall into... nice and neat and clever-- just like my mama! Oh my, I must have one now! I thought to myself and so I got to work.
And as soon as I started my work I figured you would probably want one too, so because I am a good friend I documented... and below is a tutorial. LOVES!(Oh, and you finally get to see what I did with my monogram applique!)
YOU NEED:
Approx 1/4 yard each of 2 coordinating fabrics
Scraps of Muslin or tightly woven fabric
Fusible adhesive (just scraps...)
velcro
plastic strapping (like the stuff that comes around paper boxes? Actually, you can use a lot of different things, this is to help it hold a round shape. My mom cut out a part of a plastic container, I cut the ring off a small pie plate...)
Sand (i used approx 3-4 cups of play sand)
1" wide grosgrain ribbon in contrasting color
Contrasting thread (same color as ribbon?)
Sewing machine
Step 1: CUT
(I do all my cutting at the beginning of a project, then you are good to go...)
Cut 2 10" by 20" rectangles (one of each fabric, this will be the outer and liner of the bag)
Cut 2 6.5" by 6.5" squares out of 'outer' fabric and muslin (4 squares total)
Cut 2 8" lengths of ribbon
cut 2 4" by 7/8" strips of fusible adhesive
Step 2: SEW PIN CUSHION


Pin muslin together and sew three sides and half of the fourth. Clip corners and turn inside out.
Funnel sand into the pouch you have created. I made a funnel out of scrap paper. (yes, my sand is hot pink. No, no one will see it, but it makes me feel happy inside to know it's there. Your sand does not have to be pink... but it's super fun if it is!) I filled mine as full as possible because I wanted mine nice and chubby. The tighter the sand the better it will hold pins.
 Carefully hand stitch closed the open corner of your sand-filled muslin bag and set it aside.
 Measure 4" to the center of your ribbon piece and place edge of velcro there, sew in place on the 'right' side of your ribbon. Place your fusible adhesive on one half of your 8" ribbon piece on the 'wrong side' and iron into place. Peel off paper backing and fold ribbon in half back over the adhesive, iron to fuse together (you should now have a 4" length of ribbon with velcro sewn on one side by the fold... make sense? Do the same thing to your other piece of ribbon.
 Pin together right sides of 'outer' fabric. Include the ribbons on the 'bottom' edge of the outer fabric, pin them each 1" from center, edges aligned with the edge of the fabric. (the velcro part should be touching the right side of the 'back' piece. Sew sides and bottom. Clip corners and turn right side out. Wiggle the sand filled pouch down into the outer pouch... it should be a nice snug fit. Slip stitch the top closed.
 (I used ... this monogram piece for this... turned out cute. You don't have to have a monogram, my mother has survived about 40 years sewing with a non-monogrammed pin cushion... so i know it's possible, even if it's not as fun.)


Step 3: THREAD BAG

On your 'liner' fabric sew down 2 pieces of velcro. (each one 1" from center of the 10" side of the fabric so they will line up with the ribbon straps...) Fold liner fabric in half (to form 10" square) and pin right side together. Sew just the two sides adjacent to the fold, press seams open. To make a boxed corner, pull bag apart a bit to to make a point. Measure 2" from the corner, and sew a seam across. Trim off corner. Repeat for other side of bag. Leaving right sides together still, press over 1/4" hem, then another 3/4"-- this will become a casing later.
 Repeat same steps with 'outer' fabric, only when you get to the last step (pressing) you only need to turn down a 1/4" hem, turn right side out.
 You should have 2 'bags' with boxed corners, liner still inside out, outer bag right side out. With wrong side together, wiggle the liner bag into the outer bag, pinch and pin corners to make sure it gets all the way in there. There should be a 3/4" portion of the liner that folds of the top of the outer bag, fold that up for now. Pin in place and sew along the top of the outre bag to secure it to the liner. Flip the 'overlap' hem from the liner back over the top, and top stitch from one side seam around, leaving a 2" opening on one side. Feed the plastic strapping through the casing this creates, and hand stitch the opening closed. (I used the top of a pie plate i cut off and bent up, but it was still tooooo dangerous, so I had to pull it out and wrap it in electrical tape. I recommend... the plastic strapping, much easier and safer!)
 You should have a nice lined bag with boxed corners, and a casing holding a nice round open circle at the top, and velcro on the top/inside of the bag. Did you get there with me??? Did you?
Step 4: ATTACH AND ADMIRE

How happy is your sewing table right now??? :)

Friday, August 20, 2010
TRY THIS: Recipe card maker
I recently threw a lovely shower for a girlfriend, and we asked everyone to bring a recipe card for the bride. It turned out well, and everyone did great-- except me. Well, you know me I can't be short and sweet about anything, especially a recipe, and my big loopy cursive made it extra hard to get the whole thing on one 4x6 card.
If only... if only I had known about something like this: http://www.skiptomylou.org/recipe-card-maker
Click on the link, pick a design, enter your info, and PRINT.
Clean, clear, readable instructions. Adorable designs. Super simple, professional, but still personal. Love it. Easy as pie. (mmm... pie)
Here are two I printed up this morning in about 3 mins:

Cute, right? Go on... just click on the linky-loo and print up a few of your own today. It's like instant gratification. And I needed an instant gratification project today! Ten points.
Thursday, August 19, 2010
MAKE THIS: Cinderella Cookies
 |
| All dressed up and being silly with one of my best friends! |
So I put on my 'costume' (this
My contribution to the party tonight was Cinderella cookies, starting with a yummy Cream Cheese Sugar Cookie recipe I got from my (favorite!) former music professor's wife, and topped off with my first experience with royal icing... which for the most part went well, except for I learned last night that royal icing takes approx 24 hrs to fully set, not the hour I assumed, so other than slightly mooshed frosting once they arrived... everything turned out... well...
Like this:

1 c. Sugar
1 c. Butter
3 oz cream cheese
1/2 t. Almond extract
1/2 t. vanilla
1 egg yolk
1/2 t. Salt
2 1/4 c. Flour
Cream together until fluffy: sugar, butter, cream cheese, almond and vanilla extracts and egg yolk. Mix salt and flour together; add to creamed mixture. Blend well, cover and chill for at least 30 min.
Roll out 1/3 if dough at a time on lightly floured surface to about 1/8th
H inch thick. Cut out in desired shapes. Bake 7-10 min. on ungreased baking sheet. Makes approximately 3 dozen cookies.
I cut out high heels (glass slippers) and pumpkins.
Royal icing
(I know there are lots and lots of recipes for royal icing out there... this is the most ridiculously simple one I have ever seen, and it worked great, and got nice and hard and sugar-y which... is what we were going for.)
 4 egg whites
4 cups confectioners sugar
I piped white bows on the tops first and dusted them with sanding sugar 'glitter', then piped an outline in pale blue and 'flooded' the large area. For my pumpkins I piped an outline, stem, and leaf in white and dusted the whole thing with sanding sugar. (I had plans and icing to flood the pumpkins in a pale orange... but ran out of time, so I just dusted the whole thing with sanding sugar, and they actually looked pretty cute and 'magical'. I didn't get a great presentation/finished product picture because my camera died before I could... here's the best I have, not tooooooooo bad for my first shot ever at royal icing.

Okay, this was seriously so much fun. I highly recommend BOTH a themed dress up party with grown-up girlfriends and making cookies to coordinate with the theme... fun fun! Enjoy!
Monday, August 16, 2010
LISTEN TO THIS: We're just like our parents... Oh NO!
Haha... okay, so there are a lot worse things that we could be just like, I know. But who wants to hear that they are just like their parents? Only no one.
This actually refers to a conversation I had in the car with my parents the other day. They were admiring one of my projects and discussing how impressed they were with all the things I was creating and learning to do. I figure I have to do something! For all my friends out there having babies... I'd go broke if I had to buy a gift for each and every one! I have more time and creativity than money... so handmade gifts it is. But it's not so bad... I mean, they are kind of fun and unique.
Anyway... as I was saying this my parents were just smiling... Yeah, we used to make every gift we gave when we were first married as well. My mom told me about all the sewing and crossstich project she made and gave as gifts... and my dad did wood-working projects, frames and shelves and the like...so once again, without even trying to be... It turns out I am walking in the foot steps of my parents.
And my parents are some of the greatest, most generous people I know. So I guess if I can give like they do (or start by giving like they did...) I'll be doing pretty good in life.
Z and I are richly blessed with amazing families... but it's still a LITTLE weird when you realize you are becoming like your parents... huh. :)
This actually refers to a conversation I had in the car with my parents the other day. They were admiring one of my projects and discussing how impressed they were with all the things I was creating and learning to do. I figure I have to do something! For all my friends out there having babies... I'd go broke if I had to buy a gift for each and every one! I have more time and creativity than money... so handmade gifts it is. But it's not so bad... I mean, they are kind of fun and unique.
Anyway... as I was saying this my parents were just smiling... Yeah, we used to make every gift we gave when we were first married as well. My mom told me about all the sewing and crossstich project she made and gave as gifts... and my dad did wood-working projects, frames and shelves and the like...
And my parents are some of the greatest, most generous people I know. So I guess if I can give like they do (or start by giving like they did...) I'll be doing pretty good in life.
Z and I are richly blessed with amazing families... but it's still a LITTLE weird when you realize you are becoming like your parents... huh. :)
SEW THIS: Monogram Applique
So this is a quicky tutorial and a sneak peak at my next project I am going to post... Oooooh...
So I have been wanting to figure out the who applique thing for a while. I am big into monograms... especially for baby gifts and the like I think it's super cute, and what a lovely personal addition! So this was my first attempt... and it worked out pretty well.
You need:
2 coordinating fabrics and thread in a contrasting color
fusible adhesive
artwork/monogram
1. So because this was my very first time... I chose a nice easy letter, which also happens to be the first letter of my name: V. Found a nice looking font on word, and printed it out the size that I wanted. Then... there is this little trick i learned in grade school for tracing... turn your image over and scribble a nice think line all around the border of the image you want to replicate. Then flip your paper over on top of the paper you will transfer it to (in thes case, the paper backing on the fusible adhesive) and then trace the outline of the object on the right side... VIOLA! it shows up. (Note: I learned by trial, not careful planning, that if you are using this method to create a letter or an object that needs to face a specific direction, make a mirror image... otherwise it will be all backwards!)


 |
| I had to re-do this one as a mirror image... because when I am done the 'paper' side will be the back side. |
2. Iron the fusible adhesive to the wrong side of your fabric, and once attached, cute around your shape with the paper backing still on. Next peel the paper off the back, place it in the correct location on your 'backing' fabric, and iron into place.


3. Thread your machine (AND BOBBIN!) with the same color thread and move your settings to the smaller closest zig-zag you can do... mine was actually on the button hole setting. Stitch slowly around the side of you shape... and then iron it nice and flat when you are done...

HOORAY! How cute is that? I know, it's a little rough around the corners there at the top... but it was my first try. :)
So how excited are you to use appliques to make personalized gifts, clothing, or.... maybe if you come back later I will show you what I did with mine (and we can answer my husband's question: Why is there 14 lbs of hot pink play sand in my basement?!)
Tuesday, August 10, 2010
CAN YOU BELIEVE THIS???: My first sale!
Thats right for the first time every in my life I SOLD something I created. Someone out there that I don't even know is going to be wearing something that I made, that I was paid for... Come on, thats pretty cool! I am certian it will be less exciting the more it happens (and I sure hope it happens more!) but right now I am pumped.
What was it I sold, you ask? The cute little suede shoes from this post, for some sweet tiny little baby boy. Yeah! So fun!
Anyway... now I have just a tiny bit of cash burning in my pocket from that very first sale, and I think, I think, I think I shall put it toward a nice pair of fabric cutting scissors. :) (because don't tell my mom, the seamstress, but I have been using a pair of office scissors that were ganked from the ONU music dept back in the day... not the best choice for fabric cutting, but it's all I have.)
Friday, August 6, 2010
DO THIS: Baby Tie-Dye.
So if you've been around me for more than like... 3 minutes... you know that I adore all things tie-dye. I love the process, I love the result and I love 'unexpected' things tie-dyed or made out of tie-dyed fabric. I would say this falls into 'unexpected'... tie-dyed BABY THINGS. Most specifically onesies. (when I first told my friend B I was tie-dying baby gifts she said, "Because... the child is going to be born with a bong in it's hand?" haha) Anyway-- When I do tie-dye for infants I use all one color and usually go pastel... because you don't want to outfit to overwhelm or be louder than the child!
I've NO idea how much tie-dye experience you have... but just in case the answer is... "Not much" here's a little tutorial-ish thing telling you all about how I do it!
You will need:
1 pkg of RIT dye
An old pot and wooden spoon
rubber bands
rubber gloves
tarp/plastic drop/some kind of covering for your work surface
Baby onesies
 Step 1: mix dye according to instructions on the package... You obviously make a stronger solution for more vibrant colors, and weaker for pastels. Let it heat on the stove while you prepare your work area and onsies. Spread plastic drop over your work area and be sure to have rubber/plastic gloves handy when you start handling the dye.
Step 2: Wet your onsies with water... and ring them out well. You get a nicer design if you go ahead and button the crotch of the onesies before you twist and band.
Step 3: Twist and band. There are hundreds of different designs and ways to tie-dye. I am just going to show you my two favorite... they probably have official names, but I call them swirl and rocket.

 Swirl: Pick a spot on the garment and pinch it, then twist you hand around... pulling the rest of the fabric around it. You might have to carefully arrange folds in some places, that's okay, take your time. :) once it is one large round-ish swirl, wrap rubber bands around it, crossing in the middle. You you dye it, you will notice you have made 'pie' sections... if you are doing multiple colors in your dying, your want to do each section a differt color for a cool swirl effect.

 Rocket: I think this is usually called the bulls-eye, but I call it a rocket... because... well, it looks like a rocket to me when it is all banded up! Pick a point on the garment and pinch it up and band off just that section. pull the rest of the garment down and place another rubber band tightly around the entire thing a little ways away... repeat until the entire garment is banded. (it looks like a rocket, does it not?) you can use this same method, just in multiple places on the garment and that looks cool too. It kinda looks like coral when it's all bound up like that... but that's just me. When you dye it, if you are using multiple colors, you will want to put a different color between each rubber band for a bulls-eye effect.
 Step 4: Dye according to instructions above, per your design. Dye can be applied by dunking (note: not soaking), plastic squirt bottles, or I often just spoon it onto my creations as well. Let the garments set, depending on how vibrant you desire your color to be... longer it sets the darker. RIT dye will set in nicely in 20-40 mins.
 Step 5: Rinse in HOT water, then in cold til water runs out clear. Wash your garments using a small amount of detergent on a normal cycle (in the machine) and dry in the dryer... then iron and fold nicely... wrap a stack in ribbon or put with an outfit as a lovely gift for a baby.
Mine pictured are all pink (lots of friends having baby girls...) but I have made blue ones in the past that are just charming for a little boy.
 Another thought on tie-dying onesies: I have a friend who decided she wanted to tie dye a bunch of old onesies of her daughter's that were CLEAN but stained from diaper blow-outs, puke, baby food, and other yucky baby stuff. So she went to town on a pile of onesies... and they were super cute, and you couldn't even tell they had yucky stains on them anymore. Her daughter C wore funky little tie-dyed onesies with jean skirts and it was ridiculously cute. Re-use, re-purpose, re-cycle. I love it!
Happy Tie-dying! :)
I've NO idea how much tie-dye experience you have... but just in case the answer is... "Not much" here's a little tutorial-ish thing telling you all about how I do it!
You will need:
1 pkg of RIT dye
An old pot and wooden spoon
rubber bands
rubber gloves
tarp/plastic drop/some kind of covering for your work surface
Baby onesies
 Step 1: mix dye according to instructions on the package... You obviously make a stronger solution for more vibrant colors, and weaker for pastels. Let it heat on the stove while you prepare your work area and onsies. Spread plastic drop over your work area and be sure to have rubber/plastic gloves handy when you start handling the dye.
 Step 2: Wet your onsies with water... and ring them out well. You get a nicer design if you go ahead and button the crotch of the onesies before you twist and band.
Step 3: Twist and band. There are hundreds of different designs and ways to tie-dye. I am just going to show you my two favorite... they probably have official names, but I call them swirl and rocket.


Mine pictured are all pink (lots of friends having baby girls...) but I have made blue ones in the past that are just charming for a little boy.

Happy Tie-dying! :)
Thursday, August 5, 2010
MAKE THIS: Wedding Hall of Fame
***Quick break from baby gifts, to share this project that I LOOOOOOOVE:
One of my favorite projects from my wedding was the "Wedding Hall of Fame". Super simple... but really special to me.
Our reception venue had this really long and wide hallway that we used for a 'cocktail' area. We placed little round tables down one side of the hallway, and a few chairs. Each table had just a few votives on it, and above each table we hung a picture. I wanted the frames to look like they all belonged in the same collection of things... but not 'match'. I also kind of wanted a vintage feel, and to tie in the feel and colors from our wedding and the pictures in the frames. AND like every other project for my wedding I didn't want to spend a lot of money on this project. SOOOOOO...
I bought 8 $2 wood frames from Walmart. I had 3 that were a dark cherry-stain, three that were a light oak stain, and three that were a platinum metallic finish already (they didn't have enough of the plain wood, but it looked cool in the end) I pulled them all apart (well, took out the glass, backing, etc.) and laid them out over newspaper to paint.

I had some paint from other wedding projects... one was a brilliant gold, and the other was a satin finish champagne gold color:

I sprayed the frames with a light coat of the satin champagne gold first, let that dry, then just a 'dusting' of the brilliant gold paint.
After they were dry I re-assembled, and used some purple ribbon (leftover from invitations) to make ties. I simply hot glued the ribbon to the top inside of the frames.


Then... I placed the pictures inside the frames, each with an ivory mat (came with the frames) that we wrote the couple's name and date of their wedding on... handwritten in gold. My mom wanted to print name plates on the computer, but i liked it handwritten, look more personal--and that's what this project was about for me!
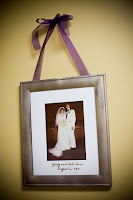
We hung the frames as usual (used 3M Velcro picture hangers so as not to damage the venue's walls) then tied the ribbons in a bow and tacked them above, so it appeared as though the pictures were hanging from the ribbons. I just have pictures of individual pics hanging, not of the whole look going down the hallway... but I promise you it looked cool. Pictured here are my sister and brother in law, my parents, and my dad's parents on their wedding day. (3 generations, cool, huh?) Not pictured here, but included in the display are my mother's parents, and Z's family on the other side of the hallway... parents and 2 sets of grandparents.


And then for those of you keeping track... that's only 7 frames, and I made 8. Hmmm... well my mom arranged with my photographer to take a picture of us early in the day on the wedding day, then they quickly transfered that to a jump drive that our coordinator ran to the one hour photo... so at our reception, as a part of the photo hall of fame, we had a picture of ourselves on display as well:

And my mom still has this one proudly displayed in the place of honor on her piano at home.
The rest of the 'leftover' frames have taken up residence in my spare bedroom... which just so happens to be purple so it looks great!
Total cost for this project:Walmart frames/mats: $16.00
Paint/glue/ribbon: already had
Old pictures of my new family: Priceless
(sorry, I couldn't resist the visa commercial...) But sixteen bucks ain't bad!
Anyway... I hope this has inspired you to create your own 'hall of fame', or at the very least unify a group of frames for a display in your house (shrug, who knows?)-- it's really so much fun, and was a special way to honor our families at our wedding. But it can also be a cool keepsake. Just the other day I was perusing some crafty blogs, when I came across THIS from one of my new favorite bloggers! What are the odds that across space and time and the interwebsss... Jessica and I had such a similar vision... I just love the internet! ha!
Tuesday, August 3, 2010
SEW THIS: Tutus for a Ballerina-Princess!
More baby gifts! Lovely little tutus... So sweet and fun and girly. (All my pregnant friends are having girls... so it's all girly projects. I think if they were all having boys, we'd be sunk. I'm not so good at boy stuff. I am, after all, the girl who bought a pink rhinestone collar for her male dog. My husband, boyfriend at the time, made me exchange it for something more manly, but after a long argument in the collar aisle of PetSmart compromised with a red rhinestone collar. But I digress...)
What little girl doesn't want to be a ballerina or a princess, or booooooth when they grow up??? (For me, it was one of those two professions... or a Marine Biologist. I wanted to play with Shamu at SeaWorld, but again, I digress...) So Ballerina-Princess it is in this sweet little apron style tutu. I've even included the easy directions and some pictures below... how lucky are you???
(SPOILER ALERT: If you are pregnant, have recently birthed a child or plan to within the next year or so, you very well could be gazing upon your gift as you peruse through these photos. Should you desire the element of surprise... look no further!)

 2. Find the center of your piece of ribbon, and match to the center of the interfacing, and attach the fusible interfacing to the back side of the ribbon starting in the middle.Fold ribbon in half lengthwise and iron (just across interfacing area).
 3. Find the center of your ribbon one again and pin on the wrong side to the center of the folded tulle strip. Pin the ends of the tulle to the ends of the interfacing strip.


I designed it that way. It was my mastermind plan to overcome you with cuteness! Did it work? Was I successful??? I love this! Almost makes me wish I had a little girl to dress up! (ALMOST!!! For now I'll just borrow someone else's.)
What little girl doesn't want to be a ballerina or a princess, or booooooth when they grow up??? (For me, it was one of those two professions... or a Marine Biologist. I wanted to play with Shamu at SeaWorld, but again, I digress...) So Ballerina-Princess it is in this sweet little apron style tutu. I've even included the easy directions and some pictures below... how lucky are you???
(SPOILER ALERT: If you are pregnant, have recently birthed a child or plan to within the next year or so, you very well could be gazing upon your gift as you peruse through these photos. Should you desire the element of surprise... look no further!)

You need:
50 in. of 1.5" pink satin ribbon
A strip 1 in wide and 14 in. long fusible interfacing
3 strips of tulle 10 in. wide and 50 in. long (I used 2 pale pink, one hot pink)
Sewing machine all threaded in PINK!
(I made this tutu to fit a baby... 3-6 mo. it can easily be made larger... no problem!!!)
1. Lay the three strips of tulle on top of each other and pin to secure. (optional, you can scallop the edges for a fluffier effect). Use a large basting (gathering) stitch and sew long ways right down the middle of the tulle strips. (do not clip threads from ends) Fold the tulle in half on the line you have sewed.
 2. Find the center of your piece of ribbon, and match to the center of the interfacing, and attach the fusible interfacing to the back side of the ribbon starting in the middle.
 3. Find the center of your ribbon one again and pin on the wrong side to the center of the folded tulle strip. Pin the ends of the tulle to the ends of the interfacing strip.
4. Gather tulle by pulling the threads at the end, pin gathers to the ribbon as you go. (This will take a little time and work wiggling and evening out gathers to get it to look just right! Be patient!) Sew the tulle to the ribbon using a basting stitch about 1/4 inch from the edge of the ribbon. It should look like this:


5. Fold the ribbon in half over the top of the tulle and top stitch.


Now... tie your ends around a little ballerina/princess and in a big bow in the back! Charming!

Oh, and remember these from the baby shoes post? Um... HELLO! Made. For. Each. Other.

I designed it that way. It was my mastermind plan to overcome you with cuteness! Did it work? Was I successful??? I love this! Almost makes me wish I had a little girl to dress up! (ALMOST!!! For now I'll just borrow someone else's.)
Subscribe to:
Posts (Atom)